Posts

Showing posts from October, 2012

Older Boy Room Ideas

Image
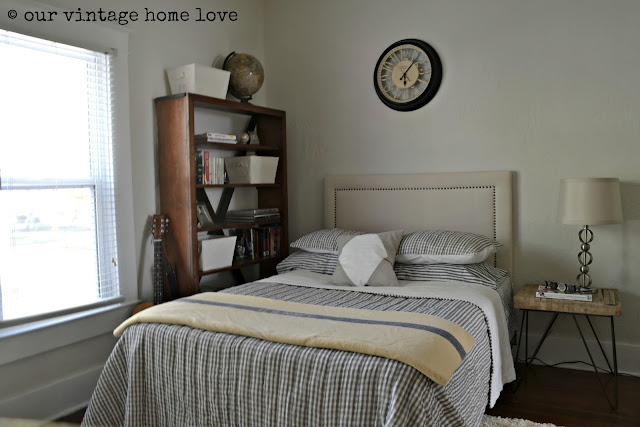
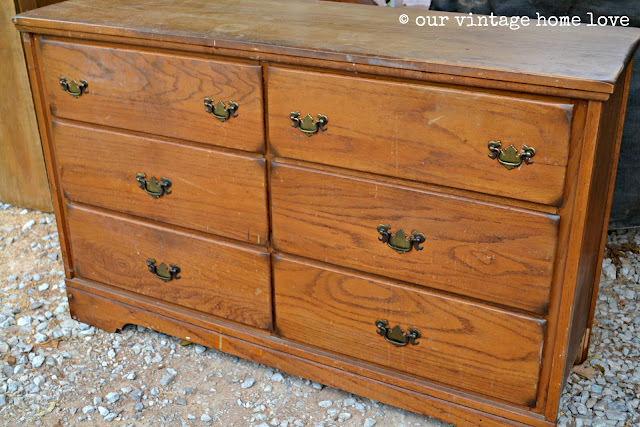
Our oldest son recently turned 20 and I really wanted to give his room an upgrade from boy to college age adult.  His room design hasn't been touched in 6 or more years so it was definitely time.  So, for many months, I've been planning and picking up items here and there and redoing them to put in his room.  I finally had everything I needed, with the exception of a desk, which I'm still looking for, so we through out pretty much everything in there except the bed and then painted the walls Classic Gray by Benjamin Moore.  They were originally a very dark navy blue and it felt like a cave in there so making it lighter was the first thing on our list. I'm going to be showing his room in stages as the other side isn't ready until I find that desk.  So, here's the side that is ready..... While planning the room design, I needed to find a dresser, bedside table, book shelf and desk.  The dresser we found at a storage auction for around $10 and I blogged about that

Dresser Redo

Image
I've just about wrapped up our oldest son's room redo but before I blog about it, I wanted to blog about a few pieces that I worked on for the room.  The first thing was the upholstered headboard that I put together last week.  Next up is this dresser that was included in a truckload of things hubby bought at an auction. It was a solid wood piece and in great condition, just needed a paint job and new hardware.  What I had in mind for the dresser was a very distressed, green, hand rubbed aged look.  So the first thing I did was paint it the same color that I painted our french door in the kitchen , which is called Spanish Green by Valspar. After it dried completely, I distressed it by sanding off a lot of the paint.  Then I rubbed on some dark walnut stain and rubbed it off.  Then rubbed on some grayish blue paint that I had but not sure of the name of, and then also rubbed that off.  I wanted several colors going on, if that makes any sense. The dresser also needed a hardwar

Upholstered Headboard Tutorial

Image
Howdy!  I'm currently working on redesigning our oldest son's room and have several projects in the works.  The biggest one is this upholstered headboard that I just finished up today.  His bed is a full size but it doesn't have a headboard so I spent several days drawing up what I had in my head and then got to work on it today.  It's not ready to go in his room yet but I wanted to share it with you anyway, as well as, the instructions for how I put it together in case anyone would like to make one. It wasn't hard, just time consuming.  I started by buying a piece of 3/4 inch thick subfloor/plywood at Lowe's.  I was feeling lazy so I asked them to cut it to size for me, which they did at no extra charge.  The size of the plywood part is 53 inches x 3 feet tall.  With the legs on the bottom, the total height is 4 feet.  I bought 3 - 1 x 3's to attach to the back of the plywood as shown in the photo below. Next, I laid high loft quilt batting on the floor tha

The Grand Opening

Image
Hello!  I hope you all had a wonderful weekend.  Our Grand Opening was a huge success and I wanted to share a few photos with you of the big day.   I was so glad to have friends and family there to take photos for me.  We couldn't have asked for a better day, except that I wish our oldest son would have been there to enjoy it with us.  Unfortunately, he had to work.  But I know he really wanted to be there. I really wanted to make our customers feel special so I thought refreshments would be nice.  Here I am getting the table ready before we opened the door. I have a friend who has a daughter who loves to bake cupcakes so I hired her to bake 100 mini cupcakes for our customers.  They were completely gone in a couple of hours.  I served apple cider, as well. We were completely shocked by the number of customers we had.  We were truly blessed. While my hubby is a genuine people person and very outgoing, I have somewhat of a social phobia and was quite nervous.  But I truly enjoyed me

Shop Sneak Peek

Image
Hello!  Happy Friday!   We've been working practically round the clock to get our shop ready for it's Grand Opening Saturday morning and boy are we exhausted.....but it's a good exhausted, you know?   Anyway, I wanted to give you a little sneak peek.....   I love this night time shot because of the lights we have inside the store.   Speaking of lights.   When we first rented this place, we weren't allowed to do all that much, which was fine because it really is a fantastic building, however, the ceiling light fixtures were very outdated ceiling fans with those tulip shaped light covers on the light kits, which I hate.   Replacing the fixtures was not really a good option so I decided to remove the ugly light covers and add Edison bulbs to give them an industrial vintage feel.   We absolutely love it.  It was certainly a fun, easy update. And the glow they provide is really nice and vintage.  Love that..... Here are a just a few of the things you can find here.... Lots o

Vintage Schoolhouse Map and Our Grand Opening

Image
If you have read our blog for awhile, you know that I have a love of vintage pull down school maps.  I've even made a few myself since they are usually way out of our price range.  Imagine my surprise when my hubby came home with 6 of them a couple of weeks ago that he picked up at a garage sale in the rain.  Talk about luck.  We kept 3 and the other 3 are going up for sale in our shop.  They are all absolutely gorgeous and date from the 1940's to 1960.  And their condition is amazing.  So are their colors.  One of the maps is exactly the color scheme that we have in our master bedroom/home office.  So, of course, that's where I put it.  I don't usually include this little home office corner of our master bedroom in photos because, well, I've never been very happy with it. I mean, who wants a computer, printer and all that mess in the bedroom.  Not me.  I'd love to have a separate room for our office but this is what we have and we just try to make it work.  Bu