Posts

Showing posts from October, 2011

Happy Halloween

Image
Hope everyone has a happy, fun and safe Halloween with friends and family! Lots to share with you this week.  A thrift chair redo that I am crazy for, a giveaway, new french inspired bread boards and a very cool find from hubby!   Stay tuned!  I'm going to go enjoy Halloween with my family!  Have a great day! Click here for bread boards.

How To Make Homemade Ravioli

Image
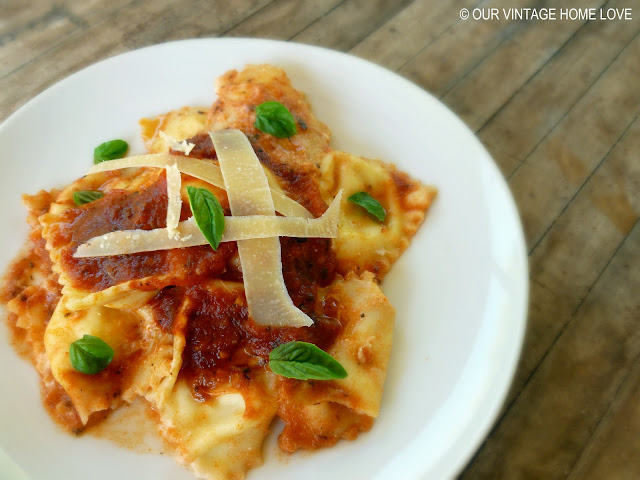
As the days get shorter and temps get cooler, we find ourselves craving those wonderful comfort foods of winter like, stuffed pastas full of gooey cheese, comforting soups and my kiddos favorite, ravioli.  They are the perfect marriage of cheese and pasta in one perfect bite. Making homemade pasta seems like a daunting task and it was to me too, but it was one of those things I wanted to learn to do.  My youngest has serious food allergies and after a couple of very scary moments when he was a baby, it became clear that making homemade food was best for him.  This ravioli is his favorite. And let me tell ya, making ravioli from scratch is a heck of a lot easier, and faster, if you have one of these gadgets . It's a ravioli press and they are pretty inexpensive and save lots of time.  And if you enjoy making your own ravioli, you gotta get yourself one.  To get started with your pasta dough, grab these ingredients.  I doubled my recipe here, however, the recipe listed below is NOT d

Amore Sign

Image
Hey there!  I worked on a little project over the weekend that I wanted to share.  I've been crazy about this painting ever since I first saw it a few years ago.  And even though I love it, it's just a little too modern for the decor in our home.  So, I created my own version that is a little more us. I  I started by cutting down 1 x 4's to a 3 foot length, laying them side by side and attaching with supportive beams in the back that were made from the left over pieces that were cut off.  I attached everything with screws in the back.   Then I stained the entire piece with Minwax special walnut stain and let dry. Next, I printed out the letters from a word program on my computer.  I don't remember the name of the font but I enlarged it to around 700 so it would fill the entire page.  I cut them out and used the cut out letters as a stencil.  I placed the letters where I wanted them and then, using a stencil brush, painted around the letters with Glidden pebble gray pain

Special Gifts

Image
Last Monday I received a gift in the mail from one of my bread board customers.  It was this adorable french wine box that she made!  Isn't it great?  I just love it!  Here's a look at the inside... And she added her initial on the back.  It really came at a perfect time.  I received it last Monday, which was my dad's birthday, so I was a little sad.  What made it even more special was that my dad was a huge wine collector.  He had a fairly good size collection when he died, part of which I received.  I'm pretty sure the wine isn't drinkable anymore but I'm not about to throw it out.  I've wanted to build something special to keep it in but haven't been motivated to do so.......until I received this special gift. But what made it the most special was the french saying on the front.  Un petite oiseau m'a dit, which translates to "a little bird told me."  I don't share personal stories very often because I'm a fairly private person le

DIY Easel Chalkboard

Image
Hey there!  After receiving several requests, I put together a tutorial of the easel style chalkboard I made for our front porch .  I am certainly no expert at making these and there may be an easier way, however, this is how I did it.  I used inexpensive 1 x 2's and leftover bead board.  You will also need 8 L brackets, two screw eyes, two small hinges and a piece of twine, I used hemp.  Total cost was around $15. Since I already made the larger one for the front porch, I decided to make a smaller tabletop version for the tutorial that I could use in the kitchen or dining room.   Decide on the height and width you'd like to do and then cut your wood based on those measurements.  This one is 23 inches high and 13 1/2 inches wide.  Put your pieces in position to get ready to attach them.  I wanted to make this easy using as few tools as possible, so I attached my pieces with L brackets. Attach all 4 L brackets for each side.  You will have two of these sections. Next up, I appli

Rustic Pallet Bench

Image
Hey there!  Have a good weekend?  My hubby and I worked on a pallet project together and we had so much fun!  It was just one of those great weekends, you know?  We worked on this and then he surprised me with a special date night.  Something we haven't had time to do in a while so it was extra special.  And then we had a fun family day on Sunday.  Those are the best kinds of weekends. I'm so glad hubby was there to help.  Those suckers are heavy and it was just plain fun working on something together.  We recently purchased a vintage record player, yes, I said record player, for our outdoor "studio", so we popped on an old Dean Martin album, turned up the volume and got to work.  Fun, I tell ya!  :) Here's what we started with, a pile of free pallets. And here's how it ended up..... This was one of those projects where I just kinda planned it as I went along and when we were finished, we just couldn't stop grinning. Everything we used for this bench was s